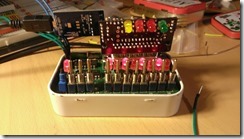
It’s a kit

by Chuck April 22, 2013

WP_20130420_003One of the guys on the COSMAC ELF mailing list, Bill Rowe, asked the people on the list if they would be interested in purchasing a run of boards for my serial port adapter. Right after I read that on the mailing list, I saw a message from Bill in my inbox asking me if I’d be interested in working with him to make a printed circuit board for the project and sell it to people who are interested.

I was OK with the idea, but with everything that’s going on with Dana I haven’t had a lot of time for other projects. Or at least I didn’t think that I did. I sent the schematic and board files to Bill so that he could make a first pass on them – once he sent them back I started playing with the board files until I had something that I could send off to Osh Park to have fabbed. Waiting the two weeks that it takes to get the boards back isn’t fun, but it beats waiting months – or not making the project at all because you don’t have a board.

Anyway, the boards came back from Osh Park, the parts that I ordered online came in (along with a whole bunch of other stuff that I didn’t really need but I thought, what the heck, I’m ordering) and I started finding all of the little things that I managed to do wrong. The DB-25 connector needs to be on the solder side of the board, not the component side. Somehow I missed where I crossed two traces. After I corrected those two faults (one with a knife and a bit of wire, the other by putting the LEDs on the solder side)  it actually worked the first time when I got the prototype built.

I’m pretty proud of the whole thing. Something that I designed and outsourced work on and built myself all works like I intended it to.

I’ve already sent out the Rev. B of the board. It will have the DB-25 connector on the other side, and with that change I was able to add a couple of other jumpers to make it easier to put the LED enable and oscillator enable lines under control of the Picaxe. But the first one will always have a special place, ‘cause it was my first.

Tags:

Electronics

Bands

by Chuck March 30, 2013

Astronomy Observation Record


Date: 3-30-2013 Time: 8:00 p.m. Location: Brambly Hill
Instrument: Northstar Aperture: 76mm Focal length: 700mm
Eyepiece/Magnification: 32/22 13/54 8/88
Transparency: Seeing:
Conditions: Cold and clear


Object Notes

M45 Pliedes

The Seven Sisters made a bright smudge on the sky -- even with my glasses off I could see them. Through binoculars they were bright and clear.

I tried my 32mm lens in the Northstar. It brought out quite a lot of detail. I couldn't see any nebulosity tonight, but there were bright chains of stars through the cluster, the most striking at the top and bottom right of the eyepiece.

Jupiter

Jupiter was the highlight of tonight's viewing. Through binoculars and the 32mm eyepiece the four Gallilean moons were quite clear. Io and Europa are close together tonight, Ganymede and Calisto are quite widely separated.

The big treat for tonight came when I put the 13mm eyepiece in. For the first time I was able to see banding on Jupiter. There were two distinct bands on either side of Jupiter's equator.

I tried using the 8mm eyepiece but could tease out no greater detail. The 80A filter did not seem to have any noticeable effect on contrast, but I tried it with the 8mm, so lack of light and a narrow field of view may have contributed.

About the time that I was ready to come in Joe and Katie came home. I had them come out and take a look too -- and then had them haul equipment inside for me.

Tags:

Backyard Astronomy

Pi Expander

by Chuck February 20, 2013

Got my Quick2Wire Raspberry Pi expansion connector and I2C port expander kit today. Came all the way from England, so shipping was almost as much as the kit. My only complaint so far is that the 26-wire expansion cable that plugs into the Pi at one end and the expansion connector on the other is only about 2 inches long. Another inch and it would easily reach the desktop when the Pi is in its case.

I haven’t started on the assembly yet, but it looks to be a straight-forward and easy build. Hopefully I’ll remember to take pictures as I work.

Tags:

Electronics

Terrible transistors

by Chuck February 14, 2013

D-Latch-ResetThat picture represents a terrible, terrible idea. Bad. Awful. Nasty. But one that is oh, so tempting. After the Visual 6502 Web site posted the control logic for the 1802, there has been a certain amount of wishful sort of thinking going around on the COSMAC ELF mailing list – along the lines of “I wonder how hard it would be to build an 1802 out of discrete transistors.” I’ll admit it. It crossed my mind. I’ve been working on building the 1802 control logic in Logic Circuit (see my last post) but I started wondering what it would take to build the logic gates that I’m simulating out of transistors.

So I did a little searching on the Web to find out how to build a 2-input NAND gate out of transistors. Turns out that it’s incredibly easy to find that information. And once you’ve found it, it’s pretty darn easy to build one on a breadboard. Or four, ‘cause that’s what you need to build a D-type transparent latch. That’s what you see there on the breadboard. Each of the little groups is a NAND gate, three 2-input NANDs and one 3-input NAND. In the section of the control logic that I’ve modeled there are 10 transparent latches of various orientations. The number of transistors goes up pretty darn fast in this thing.

Tags:

Electronics

Simulating the RCA 1802 control logic

by Chuck February 13, 2013

I've started building out the 1802 control logic from http://visual6502.org/wiki/images/6/64/Rca1802-control-reversed.gif using Logic Circuit (http://www.logiccircuit.org/). There have been a couple of things that I've had to kinda take on faith, but I seem to be getting some results.
 
I've been trying to create modules out of related gates, so far I've been able to get three modules working:

  • The Reset/Load/Wait/Run logic (U8-U11 and U73 to 78). I had to reverse the value on the CLR line to get it to work, so there may be an issue in the original tracing, but once I put an extra inverter in the CLR line the logic in that section worked great. There are only three signals that come out of this section, /LOAD, /RESET, and the clock.
  • The Johnson counter that drives the operation sequence (U133 to 139 and U190 to 193). This section has two inputs, the clock and the /RESET line. There are 7 outputs from this section, SEQ0 to SEQ7. I created special versions of D-type transparent latches that match layout of the latches in the schematic to make it easier to lay out the latches. This is an interesting section of the control logic to watch run. I attached "LEDs" to the sequence outputs so that I could follow the sequence visually. I expected each LED to light up in turn, but what happened was different. SEQ0 goes high on the rising edge of CLK0, SEQ1 goes high on the falling edge of CLK0. CLK1 raises SEQ2 and SEQ3, etc. until all of the SEQ outputs are high at the falling edge of CLK3. On the rising edge of CLK4 SEQ0 goes low, followed by SEQ1 on the falling edge of CLK4, and so on until SEQ7 goes low on the falling edge of CLK7.
  • The two 3-to-8 line decoders and the enable logic (U1 to U4). I combined these 4 chips into a single module that has 5 inputs (enable, B7 to B4) and 16 outputs (i0x to iFx). I set up the module so that the 16 outputs were in the order that the appear from top to bottom in the schematic to make it easier to follow the logic.

I zipped up the Logic Circuit data file that I've been working on and put it on my Web site. You can download the file from http://www.bramblyhill.com/downloads/RCA1802-control.zip. If you download the zip file, you'll need to install the latest version of Logic Circuit from the Web site above. It does require the .NET Framework 4.0 or higher -- if you're running Windows 7 or 8 you have that installed. If you're running Windows Vista or NT you can install the Framework from Microsoft's Web site (http://www.microsoft.com/en-us/download/confirmation.aspx?id=17851) if you haven't already.

Tags:

Electronics

Binocular Universe

by Chuck February 1, 2013

Astronomy Observation Record


Date: 2-1-2013 Time: 8:30 p.m. Location: Brambly Hill
Instrument: SeaBowld 10x50 Aperture: 50mm Focal length:
Eyepiece/Magnification: 10
Transparency: Seeing:
Conditions: Cold, clouds came up in a hurry.


Object Notes

M50

The Cloudy Nights Binocular Universe suggested this object. I identified the Winter Triangle with no problems -- Sirius & Betelgeuse are old friends; Procyon was -- dare I say -- blindingly obvious. Unfortunately I wasn't able to get a firm fix on M50 before the clouds rolled in. Zoomed in might be a better description. At one point I saw what might have been a blur with two stars as described, but I could never find it again.

M42

Orion's nebula was quite clear tonight. Areas of nebulosity were visible between pairs of stars. The most striking feature weer a bright pair of stars at the top of the nebula, another bright pair halfway down, and then two more at the tip. The central bright points were the bright star-forming regions -- at least that's what it looks like when I compare what I saw to pictures.

M45 Pliedes

To my old eyes the Pliedes are a bright blur, but resolve into the Seven Sisters as soon as binoculars are brought to bear. The glow form the Sisters on the nearby dust is evident even to the naked eye, and readily apparent in binoculars, but I don't see any appreciable color to the glow.

Jupiter

With binoculars I was only able to resolve one of Jupiter's moons tonight, though three should have been visible. The planet was easily outshining both the Pliedes and Aldebaran.

Hyades

This cluster caught my eye as I looked toward Jupiter. It was an impressive sight in binoculars -- I'm sure that a telescope would cut off too much of the cluster to make it better.

Tags:

Backyard Astronomy

Northern Stars

by Chuck January 20, 2013

Astronomy Observation Record


Date: 1-20-2013 Time: 8:30 p.m. Location: Brambly Hill
Instrument: Naked Eye Aperture: Focal length:
Eyepiece/Magnification:
Transparency: Seeing:
Conditions: Cold

Took our Australian exchange student out to show her Polaris. Since she's from the Southern Hemisphere, she's never seen the stars that are below the horizon in Sydney.

Of course, Libby has the Southern Cross and I haven't seen that, so she has me there.

Also showed her:

  • Pliedes
  • Orion
  • Gemini
  • and a few of the names that I know in the area:
    • Betalguese
    • Sirius
    • Castor
    • Pollux

Tags:

Backyard Astronomy

Back on the air

by Chuck December 27, 2012

The Brambly Hill web site has been down for a couple of weeks -- something went wrong with the hosting system, and then I messed up the code for the underlying blog software somehow, and then I got frustrated trying to get it fixed and left it sit for a while.

In any case, I've managed to get the servers up and running, get a new version of blogengine.NET up and running, and get all of the posts from the last 10 years copied from the old system to the new. I wish I'd been paying better attention to how I backed up the posts so I didn't have to do a copy/paste job for all of them, but I'm finished now and things should be back to normal.

Which means a post about once every six months or so. If I'm lucky.

Welcome back.

Tags:

Blog

Weekend gardening

by Chuck September 4, 2012

Been spending my weekends working on the vegetable gardens. The garden inside our Tango-proof fence has always been a little haphazard – it wasn’t so much planned as it just sorta grew up over the years. One of the problems with planter boxes in the garden was that they didn’t line up with each other; that left little nooks and crannies where I couldn’t get the lawn mower in to cut the grass.

Pretty soon the whole garden got out of control:

I really needed to mow in there once or twice, and get the line trimmer in to take care of the corners, but with one thing and another I pretty much left the garden alone this summer. So in the tradition of men in my family I got out the power tools and started over:

I used the tractor to lift out the old garden boxes, then moved the planting soil over to the compost bin. After that, I stripped most of the grass out using the tractor bucket. I needed to clean up the edges by hand, so that took me another day of shovel work. Finally, I used my pile of dirt left over from other projects to fill in the hole that I made digging the grass out. Took two weekends, but all of the preparation work was complete.

Over the long Labor Day weekend I spent two days putting things back together. First I laid out, built and placed new cedar forms for raised beds (I re-used the one old bed that still worked). Then I dug trenches and laid 5 watering circuits that I took back to the side of the garden shed where I will put the manifold to control them. Each raised bed has two feed lines each on a different circuit so that I can water however I want – one feed line will be for drippers and the other will be for mini sprinklers or bubblers.

Tags: ,

Farm

Moving lights

by Chuck August 12, 2012

Astronomy Observation Record


Date: 8-11-2012 Time: 10:00 p.m. Location: Brambly Hill
Instrument: Northstar Aperture: 76mm Focal length: 700mm
Eyepiece/Magnification: 32/22 17/41 13/54
Transparency: Seeing:
Conditions: Clear, warm


Object Notes

Perseid Meteor Shower

Throughout the night we would get the occasional bright flash of a meteor from the Persied swarm. They ranged from single and double streaks crossing the sky to bright flashes with almost no streak.

ISS

While Joe, Katie and I were starting to look for meteors a bright satellite passed overhead. It looked just like the ISS usually looks, so I checked online and sure enough there was a pass scheduled. Just as the ISS passed under Cassiopia it suddenly got very bright. We must have picked up a direct reflection of the sun off of a solar panel.

M13

Hercules was hiding the cluster this evening. I tried to find it for half an hour before finally tracking it down.

It appears as a fuzzy patch of stars nicely framed by three bright stars.

Found M13 using the 32mm eyepiece, then shifted to the 13mm. While the 13mm was useful, the best view was with the 17mm eyepiece.

M92

I tried to get a sight of M92, but wasn't able to find it. Again, I need to spend some time learning how to find stuff using "Turn Left."

Mizar & Alcor

Stopped to say hello to my favorite set of double stars.

Tags:

Backyard Astronomy

Log in